Tailing the MongoDB Oplog and Broadcasting With RabbitMQ
The MongoDB operations log, or oplog, is a powerful yet somewhat mystifying part of the MongoDB core.
The oplog is the basis for replication and understanding its nuances in your production environment is very
important for success over the long run. For more information I recommend reading the
official documentation
I have been tinkering with “tailing” the oplog for some time and while reading various blogs, stack
overflow questions, and talking with other MongoDB users I decided to write up some of my findings.
So what do I mean by tailing the oplog? A tailable cursor in MongoDB is a query that has had the tailable
option added to it. This causes the cursor to continue “listening” for new data to be returned. This is of
interest on the oplog because all operations on the database can be seen here. Thus, we can use the oplog
to replicate action to other databases, set up filter alerts, or do anything else we can dream up. In this
article I am going to show how to connect to the oplog using java and then send messages based on what is
going on using RabbitMQ. Broadcasting messages will allow us to implement information
consumers completely independently of the code base we will be using to produce the messages.
The code in these examples should be considered example code and not production quality.
All code used in the examples may be found on my github site
There are plenty of excellent tutorials out there on how to set up tailable cursors and tailing the oplog
and I do not claim this will be any better than others. One thing I have found missing from many of them is
how to connect into a sharded cluster and auto detect the replica sets inside of it and then begin the
tailing automagically.
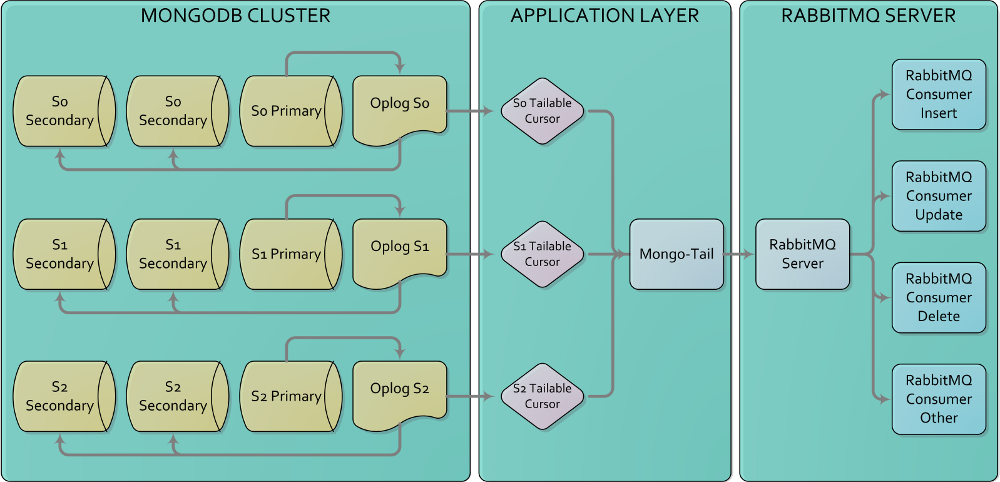
So, with that in mind, lets take a look at what will be discussed in this writeup. Below you will find the
system flow we will be creating. We will be using a sharded replicated MongoDB instance. We will then use a
multi-threaded java process to connect into each shard's oplog. Once we open the tailable cursor to each oplog
we will then broadcast each operation to RabbitMQ.
Why RabbitMQ you ask?
By moving the consumers of the MongoDB operations from the tailing program itself we can separate our concerns. We can attach
any sort of consumer to the RabbitMQ server we like. Infact, using fanout techniques we can attach as many RabbitMQ consumers as
as we like. Perhaps we want to replicate the MongoDB data to MySQL or set up filters to watch for specific information flowing
through the system. In the example code we will
be using RabbitMQ routing keys to divert different types of MongoDB operations to different queues. The examples
are designed to all run in a local environment and when kept to a small scale do run on my laptop.
To initiate the sharded replicated MongoDB environment I am using a script written by Andrew Erlichson for MongoDB's
online training courses (which I highly recommend). A windows version may also be found here.
RabbitMQ is not the focus of this writeup so I will not be going into detail on how to set it up. For more
information I recommend reading their documentation. At the time
of writing I am working with RabbitMQ version 3.3.5 for mac. I will say that getting RabbitMQ running on Windows is
possible but not a lot of fun.
On the java front I will be using java 7 and primarily running on mac. I have tested the tailing code on Windows 7
and RHEL. There are quite a few topics being covered, so for this exercise I will not be using MongoDB authentication. While
this is ok for examples, it is probably not good for your production environment.
Now that we have all that out of the way, lets have some fun.
We will begin by obtaining a connection into our MongoS. The connection code is located in our main class
ShardedReplicaTailer
The properties file that is being loaded currently points to localhost. Once we have a connection to a MongoS we can
use the
ShardSetFinder to obtain the shard information:
Example output when running a local replicated sharded environment:
Adding { "_id" : "s0" , "host" : "s0/localhost:37017,localhost:37018,localhost:37019"}

Adding { "_id" : "s1" , "host" : "s1/localhost:47017,localhost:47018,localhost:47019"}

Adding { "_id" : "s2" , "host" : “s2/localhost:57017,localhost:57018,localhost:57019"}
Here we can see that we have added the shard names (s0 - s2) and their associated server lists (replica sets).
Now the magic happens
From here we need to create connections into the various replica sets to gain access to the oplog. In this
case we will spawn a thread for each shard so we can tail each shard set independently. One other very
important thing to keep in mind is the time stamp of the operations. Unless you wish to replay the entire oplog
everytime the program starts you must persist the timestamps of the latest operation per shard. This is why I
used a map to hold the connection information. Now each thread may keep track of latest time stamp for its
specific shard and use the shard name (the map key) for this.
Code excerpt from: OplogTail
From the local DB we got the DBCollection "oplog.rs"
We then get a timestamp - this is very important as we do not want to reply the entire oplog every time we connect
(at least in this case)
We want to sort the return by the "$natural" operator, this will return the documents in the order they appear on disc.
For more information see the MongoDB docs
We then add three options to our query:
Full Definition as found in the MongoDB documentation. ***
Bytes.QUERYOPTION_TAILABLE
Tailable means cursor is not closed when the last data is retrieved. Rather, the cursor marks the final object's
position. You can resume using the cursor later, from where it was located, if more data were received. Like any
"latent cursor", the cursor may become invalid at some point (CursorNotFound) – for example if the final object
it references were deleted.
</ul>
Bytes.QUERYOPTION_AWAITDATA
Use with TailableCursor. If we are at the end of the data, block for a while rather than returning no data.
After a timeout period, we do return as normal.
</ul>
Bytes.QUERYOPTION_NOTIMEOUT
The server normally times out idle cursors after an inactivity period (10 minutes) to prevent excess memory use.
Set this option to prevent that.</ul>
</ul>
</ul>
At this point we are ready to start tailing. The first thing we will do is use an injection strategy to create our RabbitMQ tailing class. I will not
go over this class now, but you may find the code here: TailTypeInjector. This injection stretegy will allow us to chain tailing operations together at a later date.
Lets take a look at our tailing classes:
First, we define the following interface: TailType:
I hope this this information was useful. If you have not fallen asleep yet, here is a video
that shows the systems linked together! My first ever attempt at a screen recording is a bit fuzzy so I hope to
post a higher quality video soon.
About Me
Jai Hirsch
Senior Systems Architect
CARFAX
jai.hirsch@gmail.com